Battery switch on travel trailer function is crucial for managing your RV’s power. Understanding how these switches work – whether single-pole, double-pole, or rotary – is key to preventing dead batteries and protecting your valuable electronics. This guide breaks down everything you need to know, from installation and wiring diagrams to troubleshooting tips and essential maintenance. We’ll cover different switch types, their advantages and disadvantages, and how to choose the right one for your travel trailer setup.
Let’s get started!
This guide will walk you through the intricacies of your travel trailer’s battery system, explaining the purpose of the battery switch, its various types, and how to properly maintain it. We’ll cover installation, troubleshooting common problems, and safety precautions to ensure your RV’s electrical system operates smoothly and safely.
Types of Battery Switches in Travel Trailers
Choosing the right battery switch for your travel trailer is crucial for managing your power sources effectively and preventing potential electrical issues. Different switches offer varying levels of control and complexity, each with its own set of pros and cons. Understanding these differences will help you select the best option for your needs.
Battery Switch Types and Their Characteristics
Several types of battery switches are commonly used in travel trailers, each designed to handle specific power management needs. These switches control the flow of electricity between your trailer’s batteries (typically a house battery and a chassis battery) and various electrical components.
| Switch Type | Description | Advantages | Disadvantages |
|---|---|---|---|
| Single-Pole, Single-Throw (SPST) | A simple on/off switch controlling one circuit. Often used for a single house battery. | Simple, inexpensive, easy to install. | Limited functionality; only allows for connecting or disconnecting one battery at a time. No isolation. |
| Double-Pole, Double-Throw (DPDT) | Allows switching between two sources (e.g., shore power and battery) or isolating both. | Provides more control, allows for switching between sources or isolating both. | More complex installation, slightly more expensive than SPST switches. |
| Rotary Battery Switch | A multi-position switch that allows for selecting different battery combinations (e.g., both batteries, one battery, neither). | Offers multiple configurations, including the ability to completely isolate batteries. Good for managing multiple batteries. | Can be more expensive than simpler switches; more complex to operate. |
| Automatic Switching Systems | These systems automatically switch between battery and shore power based on the availability of shore power. Often incorporate battery monitoring and charging capabilities. | Convenient, automated switching; often includes advanced features like battery monitoring. | Most expensive option; more complex installation and potentially more points of failure. |
Considerations When Choosing a Battery Switch
The best type of battery switch for your travel trailer depends on several factors, including the number of batteries you have, your budget, and your desired level of control over your power system. A simple SPST switch might suffice for a small trailer with a single house battery, while a more complex rotary switch or automatic system is better suited for larger trailers with multiple batteries and sophisticated electrical systems.
Always consult with a qualified RV technician if you’re unsure which type of switch is right for your setup.
Function and Purpose of a Battery Switch
A battery switch is a crucial component in a travel trailer’s electrical system, acting as the central control for managing power flow between different battery banks. It’s essential for safe and efficient operation, preventing unwanted battery drain and protecting sensitive electronics. Think of it as a gatekeeper for your trailer’s power.The primary function of a battery switch is to isolate and selectively connect the house batteries (powering the interior lights, appliances, and other systems) from the chassis battery (used for starting the tow vehicle).
So, you’re an audiophile who travels? Awesome! Make sure you check out this guide on setting up your audiophile travel aetup for the best sound on the go. It’s crucial to protect your gear, right? Don’t forget to sort out your travel insurance beforehand; getting a policy from Aon travel insurance is a good starting point to cover any mishaps with your precious equipment.
Planning ahead ensures a smooth and enjoyable trip with your favorite tunes!
This allows you to manage power flow independently, preventing situations where a discharged house battery drains the chassis battery, leaving you stranded. It also protects the sensitive electronics in your trailer from voltage fluctuations or surges that might occur if the batteries were directly connected.
Power Flow Management Between Batteries
A battery switch typically offers several positions, allowing for complete isolation of both battery banks, connection of only the house batteries, connection of only the chassis battery, or the combined connection of both. In the “off” position, both batteries are completely disconnected, preventing any current flow. In the “house” position, only the house batteries power the trailer’s interior systems.
The “both” position connects both batteries, which is useful for charging the house batteries using the alternator of the tow vehicle. The “chassis” position isolates the house battery while allowing the chassis battery to power the vehicle’s starting system. This careful control is critical for efficient power management.
Prevention of Battery Drain and Protection of Electronics
By isolating the house batteries when the trailer isn’t in use, the battery switch prevents parasitic drain. Parasitic drain is the slow, steady discharge of a battery caused by small amounts of current flowing through various circuits even when the trailer is turned off. This can eventually lead to a completely discharged battery, leaving you without power when you need it.
The switch effectively cuts off these drain pathways, extending the life of your batteries and ensuring power is available when you need it. Moreover, the switch acts as a safeguard against voltage spikes or surges that could damage sensitive electronics in the trailer. By isolating the batteries, the switch prevents these surges from reaching the delicate components, ensuring their longevity and reliable operation.
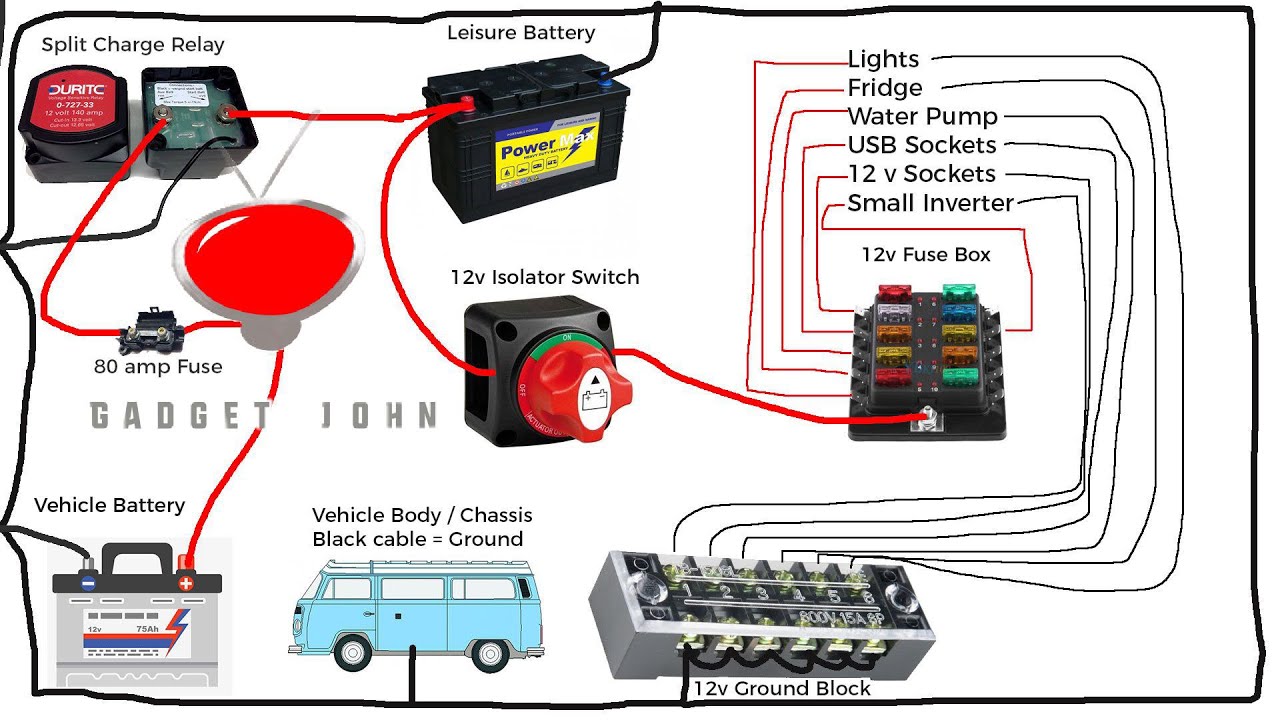
Wiring and Installation of a Battery Switch
Installing a battery switch in your travel trailer is a crucial step in managing your power system. It allows you to isolate your house batteries from the tow vehicle’s charging system, preventing unwanted battery drain and protecting your investment. This section details the wiring and installation process, ensuring a safe and effective setup.
A typical wiring diagram involves connecting the battery switch between your house batteries and the charging sources (converter, solar, alternator). This isolates the batteries when the switch is off, protecting them from discharge. When the switch is on, power flows freely to and from the batteries. Understanding this basic principle is key to successful installation.
So, you’re an audiophile who loves to travel? Awesome! Make sure you check out this guide on audiophile travel setups to keep your tunes sounding amazing on the go. It’s crucial to protect your gear, and while you’re planning your trip, don’t forget to sort out your travel insurance. Getting Aon travel insurance will give you peace of mind knowing your valuable equipment is covered in case of loss or damage.
Happy travels and happy listening!
Typical Wiring Diagram for a Battery Switch
The diagram below illustrates a common configuration. Remember, variations exist depending on the specific components in your setup (e.g., number of batteries, charging sources). Always consult the instructions for your specific battery switch and other components.
Imagine a rectangle representing your battery switch. On one side, we have two wires coming from your house batteries (positive and negative). On the other side, we have wires going to your converter/charger, and another set to any other charging sources like solar panels. Each wire is clearly labelled (positive and negative) and connected to the appropriate terminals on the switch.
A fuse or circuit breaker is included in the positive wire close to the battery for safety. The negative wire often connects directly to the chassis (ground) of the trailer near the battery.
Step-by-Step Installation Instructions
Before starting, disconnect the negative terminal from your house batteries. This is a crucial safety precaution to prevent accidental short circuits and shocks. Always work with a helper if possible, especially when handling batteries and heavy wiring.
- Choose the installation location: Select a location that is easily accessible, well-ventilated, and protected from the elements. A dry, secure compartment near the batteries is ideal.
- Mount the switch: Securely mount the battery switch using appropriate hardware. Ensure it’s firmly attached to prevent vibrations from loosening it.
- Connect the battery cables: Connect the positive and negative cables from your house batteries to the appropriate terminals on the battery switch. Use appropriately sized and properly insulated cables. Secure all connections with appropriate connectors to prevent corrosion and loose connections.
- Connect the charging sources: Connect the wires from your converter/charger and other charging sources to the output terminals of the battery switch. Again, use appropriately sized and properly insulated cables, and secure all connections.
- Connect the ground wire: Connect the negative battery cable to the chassis of the trailer. This provides a reliable ground path for the entire system.
- Install a fuse or circuit breaker: Install a fuse or circuit breaker in the positive wire, as close as possible to the battery. This is a critical safety measure to protect the wiring and components from overcurrent.
- Test the installation: Reconnect the negative battery terminal. Turn the battery switch on and off, checking that your trailer’s electrical system functions correctly. Verify that all connections are secure and that the fuse or circuit breaker is working properly. If you encounter any issues, double-check all connections before proceeding.
Visual Representation of a Correctly Wired Battery Switch Installation
Imagine a simplified diagram. Two batteries are connected to the input terminals of a battery switch. The positive terminal of each battery is connected to a separate positive terminal on the switch using a appropriately sized and insulated wire. Similarly, the negative terminals of each battery are connected to a separate negative terminal on the switch. From the output terminals of the battery switch, wires run to the positive and negative terminals of the converter.
A fuse is placed in the positive wire running from the battery to the switch. A separate ground wire runs from the negative terminal of the battery to the trailer’s chassis. The switch itself is securely mounted in a protective enclosure. All connections are clean, secure, and protected from moisture and corrosion.
Troubleshooting Common Battery Switch Issues

Dealing with a malfunctioning battery switch in your travel trailer can be frustrating, leaving you without power when you need it most. This section will guide you through identifying and resolving common problems, helping you get back on the road quickly. Understanding the typical issues and their solutions will empower you to handle most problems yourself, saving you time and money.Troubleshooting battery switch problems involves systematically checking various components to pinpoint the source of the issue.
This usually starts with the simplest checks and progresses to more involved inspections if necessary. Remember safety first; always disconnect the negative battery terminal before working on any electrical components.
Identifying Common Problems
Common problems with travel trailer battery switches range from complete power loss to intermittent functionality. Sometimes, a blown fuse is the culprit, while other times, the problem lies with corroded connections or a faulty switch itself. Understanding these potential issues is the first step towards effective troubleshooting.
- No Power: This indicates a complete break in the circuit, potentially caused by a blown fuse, a disconnected wire, or a faulty switch.
- Intermittent Power: This suggests a loose connection, corrosion, or a switch that’s failing intermittently.
- Blown Fuses: A blown fuse is often a symptom of a larger problem, such as a short circuit somewhere in the wiring.
- Switch Not Engaging: The switch itself might be malfunctioning, preventing it from making the proper connections.
Troubleshooting Steps
A methodical approach to troubleshooting is crucial. Begin with the simplest checks and move on to more complex ones only if necessary. This minimizes the time spent and ensures you address the root cause efficiently.
- Check Fuses: Inspect all fuses in the battery switch circuit and replace any blown fuses with fuses of the same amperage rating. If a fuse blows immediately after replacement, this points to a short circuit in the wiring that needs immediate attention.
- Inspect Connections: Carefully examine all wire connections at the battery switch and the battery terminals for corrosion, looseness, or damage. Clean any corroded connections with a wire brush and apply dielectric grease to prevent future corrosion. Tighten any loose connections securely.
- Test the Switch: If the fuses and connections are fine, test the switch itself using a multimeter to ensure it’s making proper contact. If the switch is faulty, it will need to be replaced.
- Trace Wiring: If the problem persists, carefully trace the wiring from the battery switch to the various components in your travel trailer to identify any breaks, shorts, or other issues. This may require using a wiring diagram for your specific model.
Potential Causes and Solutions
The following list summarizes common causes of battery switch problems and their corresponding solutions. Remember to always disconnect the negative battery terminal before working on electrical components.
- Problem: Blown Fuse. Solution: Replace the fuse with one of the same amperage rating. If the new fuse blows immediately, there is a short circuit in the system requiring professional attention.
- Problem: Corroded Connections. Solution: Clean the connections with a wire brush and apply dielectric grease.
- Problem: Loose Connections. Solution: Tighten all connections securely.
- Problem: Faulty Battery Switch. Solution: Replace the battery switch with a new one of the same type and amperage rating.
- Problem: Damaged Wiring. Solution: Repair or replace any damaged wiring. This often requires tracing the wiring and may necessitate professional assistance.
Maintenance and Care of Battery Switches
Proper maintenance of your travel trailer’s battery switch is crucial for ensuring reliable power and extending the lifespan of your batteries. Neglecting this simple task can lead to corrosion, poor connections, and ultimately, system failure, leaving you stranded without power. Regular inspection and cleaning are key to preventing these problems.Regular maintenance will help you avoid costly repairs and downtime.
A proactive approach is far better than reactive troubleshooting.
Routine Maintenance Schedule
A simple, yet effective, maintenance schedule should be followed. This involves visual inspections and cleaning at least twice a year, or more frequently if you use your trailer in harsh environments (coastal areas, dusty regions). Before each major trip, a quick check is also recommended. This ensures your battery system is ready for extended use.
Battery Switch Inspection for Corrosion and Damage
Inspecting your battery switch for corrosion and damage is a straightforward process. Start by visually examining the switch itself, looking for any signs of rust, green corrosion (indicating oxidation), or physical damage such as cracks or loose components. Pay close attention to the terminals – both the main terminals connecting to the batteries and any smaller terminals for accessories.
Loose connections or corrosion at these points are common culprits for electrical problems. Look for discoloration, pitting, or white powdery residue around the terminals. These are all signs of corrosion that need addressing. Also, check the wiring for any fraying or damage near the switch.
Cleaning Methods for Optimal Battery Switch Performance
Cleaning your battery switch is vital to maintaining its efficiency and preventing corrosion. Begin by disconnecting the battery cables from the switch. This is a critical safety precaution to prevent accidental shorts. Use a wire brush or a specialized battery terminal cleaner to remove any corrosion from the terminals and the switch body itself. A baking soda paste (baking soda mixed with water to form a thick paste) can be applied to corroded areas, left for a few minutes, then scrubbed off with a brush.
Once cleaned, apply a dielectric grease to the terminals. This grease helps prevent future corrosion and ensures a good electrical connection. After cleaning and applying the grease, carefully reconnect the battery cables, making sure the connections are tight and secure. Avoid over-tightening, which could damage the terminals. Finally, test your system to ensure everything is functioning correctly.
Battery Switch Selection and Considerations: Battery Switch On Travel Trailer Function
Choosing the right battery switch for your travel trailer is crucial for safe and reliable power management. A poorly chosen switch can lead to overheating, system failures, and even fire hazards. This section will guide you through the process of selecting a suitable battery switch based on your trailer’s needs and characteristics.Selecting the appropriate battery switch involves considering several key factors to ensure compatibility and long-term performance.
These factors directly impact the safety and efficiency of your trailer’s electrical system.
Amperage Rating, Battery switch on travel trailer function
The amperage rating of your battery switch must exceed the maximum current draw of your trailer’s electrical system. This rating is usually expressed in amps (A) and determines the maximum amount of current the switch can safely handle. To determine the correct amperage, calculate the total amperage draw of all devices in your trailer that will be connected to the battery.
For example, if your trailer has a combined load of 100 amps, you’ll need a switch with a rating of at least 150 amps to account for surge currents and provide a safety margin. Underestimating this value can lead to the switch overheating and potentially failing.
Switch Type
Several types of battery switches are available, each with its own advantages and disadvantages. Common types include:
- Rotary Switches: These switches offer a simple, manual on/off operation, typically with multiple positions to control separate battery banks or circuits.
- Push-Button Switches: These switches are often easier to use than rotary switches, especially in tight spaces, but may lack the robust construction of some rotary options.
- Remote Switches: These allow you to control your battery switch from a convenient location, such as inside your travel trailer, eliminating the need to access the switch’s physical location.
The choice of switch type depends largely on personal preference and the specific needs of your setup. Consider factors such as ease of use, durability, and the desired level of control.
Mounting Location
The location of the battery switch should be easily accessible yet protected from the elements. It should be installed in a dry, well-ventilated area, away from any potential sources of ignition or damage. Ensure the location allows for easy access to the switch’s terminals for maintenance or repairs. Ideally, the location should be easily accessible without requiring excessive bending or reaching.
Brand and Model Comparison
Several reputable brands manufacture battery switches for RVs and travel trailers. While a comprehensive comparison of every brand and model is beyond the scope of this guide, consider researching specific features offered by different manufacturers. Some key features to consider include: robust construction materials (e.g., heavy-duty contacts and housings), clear and easy-to-understand labeling, and readily available replacement parts.
Look for reviews and testimonials from other RV owners to gauge the reliability and performance of different brands and models. Examples of reputable brands include Blue Sea Systems and Perko, known for their quality and longevity. However, always check the specific amperage rating to ensure it meets your trailer’s requirements regardless of brand.
Safety Precautions Related to Battery Switches
Working with battery switches and the electrical systems in your travel trailer requires careful attention to safety. Improper handling can lead to serious injury from electric shock, burns, or even explosions from the batteries themselves. Always prioritize safety to avoid potential hazards and ensure a successful installation and maintenance process.
Battery systems contain significant electrical energy, capable of delivering powerful shocks even at low voltages. Furthermore, lead-acid batteries produce flammable hydrogen gas during charging, increasing the risk of fire or explosion if proper ventilation isn’t maintained. This section Artikels the crucial safety precautions to take when working with your travel trailer’s battery switch and electrical system.
Personal Protective Equipment (PPE)
Appropriate personal protective equipment is essential when working with batteries and electrical systems. Failure to use PPE can result in serious injury.
The following items are crucial for your safety:
- Safety Glasses: Protect your eyes from splashes of battery acid or flying debris.
- Gloves: Insulated rubber gloves are essential to prevent electric shock. Acid-resistant gloves provide additional protection against battery acid spills.
- Closed-toe Shoes: Protect your feet from potential hazards on the ground, including spills.
- Long Sleeves and Pants: Protect your skin from sparks, splashes, and abrasion.
Disconnecting the Battery Before Working
Before performing any work on the battery switch or related electrical components, always disconnect the negative (-) battery cable first. This prevents accidental shorts and reduces the risk of electric shock.
Use a wrench appropriate for the battery terminal size and ensure a firm connection when reconnecting the cables.
Working in a Well-Ventilated Area
Lead-acid batteries release hydrogen gas, which is highly flammable. Always work in a well-ventilated area to prevent the buildup of this gas and the risk of explosion. If working indoors, ensure adequate ventilation to keep the area fresh and free of flammable gases.
Never work near open flames or sparks when working with batteries. A spark could ignite the hydrogen gas, causing a serious explosion.
Proper Tool Usage
Use insulated tools designed for electrical work to prevent accidental shocks. Never use tools with damaged insulation. Inspect your tools before use and replace any with worn or damaged insulation.
Using the wrong tools or damaged tools significantly increases the risk of accidents. For example, using a metal wrench on a battery terminal could cause a short circuit and a serious electric shock.
Neutralizing Battery Acid Spills
If battery acid spills, neutralize it immediately using baking soda and water. Avoid direct contact with the acid; use caution and wear appropriate PPE during cleanup. Always refer to the battery manufacturer’s instructions for specific cleanup procedures.
A significant spill should be reported to appropriate authorities and the area thoroughly cleaned according to safety regulations.
Mastering your travel trailer’s battery switch is essential for a smooth and enjoyable RV experience. By understanding its function, properly installing and maintaining it, and knowing how to troubleshoot common issues, you can ensure reliable power and avoid costly repairs. Remember safety first! Always disconnect power before working on any electrical components. With a little knowledge and care, you’ll be confident in managing your RV’s power system and hitting the road worry-free.
Q&A
What happens if I leave my battery switch on all the time?
Leaving your battery switch on constantly can drain your house batteries, especially if you have parasitic draws (devices consuming power even when turned off). It’s best to turn it off when not using the trailer.
How do I know which amperage battery switch I need?
The amperage rating of your battery switch should match or exceed the total amperage draw of your RV’s house appliances. Check your appliance manuals for individual amperage ratings and add them up to determine your total requirement.
Can I install a battery switch myself?
While possible, installing a battery switch requires some electrical knowledge. If you’re unsure, it’s best to consult a qualified RV technician to avoid potential hazards.
Why is my battery switch not working?
Several things can cause a non-functioning battery switch, including blown fuses, corroded connections, or a faulty switch itself. Check fuses first, then inspect connections for corrosion before replacing the switch.
